
Organization & settings
Go to workspaceWhich sections do the settings have?
You open the settings from your user menu at the bottom left. On the left you choose the section, on the right you see its content. Members only see some of the sections. The list notes what only admins see.
- General (Allgemein): profile, default model, appearance.
- Account (Konto): password, two-factor sign-in, log out.
- Organization (Organisation): company details, storage, processing in the EU. Admin.
- Access (Zugriff): booked areas and approval gate.
- Members (Mitglieder): invite and manage your team. Admin.
- Usage (Nutzung): your personal spending limit.
- My plan (Mein Tarif): your seat plan.
- Billing (Abrechnung): invoices, top up credits. Admin.
- Integrations (Integrationen), Custom fields (Zusatzfelder), Our company (Unsere Firma): admin.
- Activity (Aktivität): log of AI actions.
How do I change my organization's details?
The Organization (Organisation) section holds the company details. Only admins can change them, everyone else can only view them.
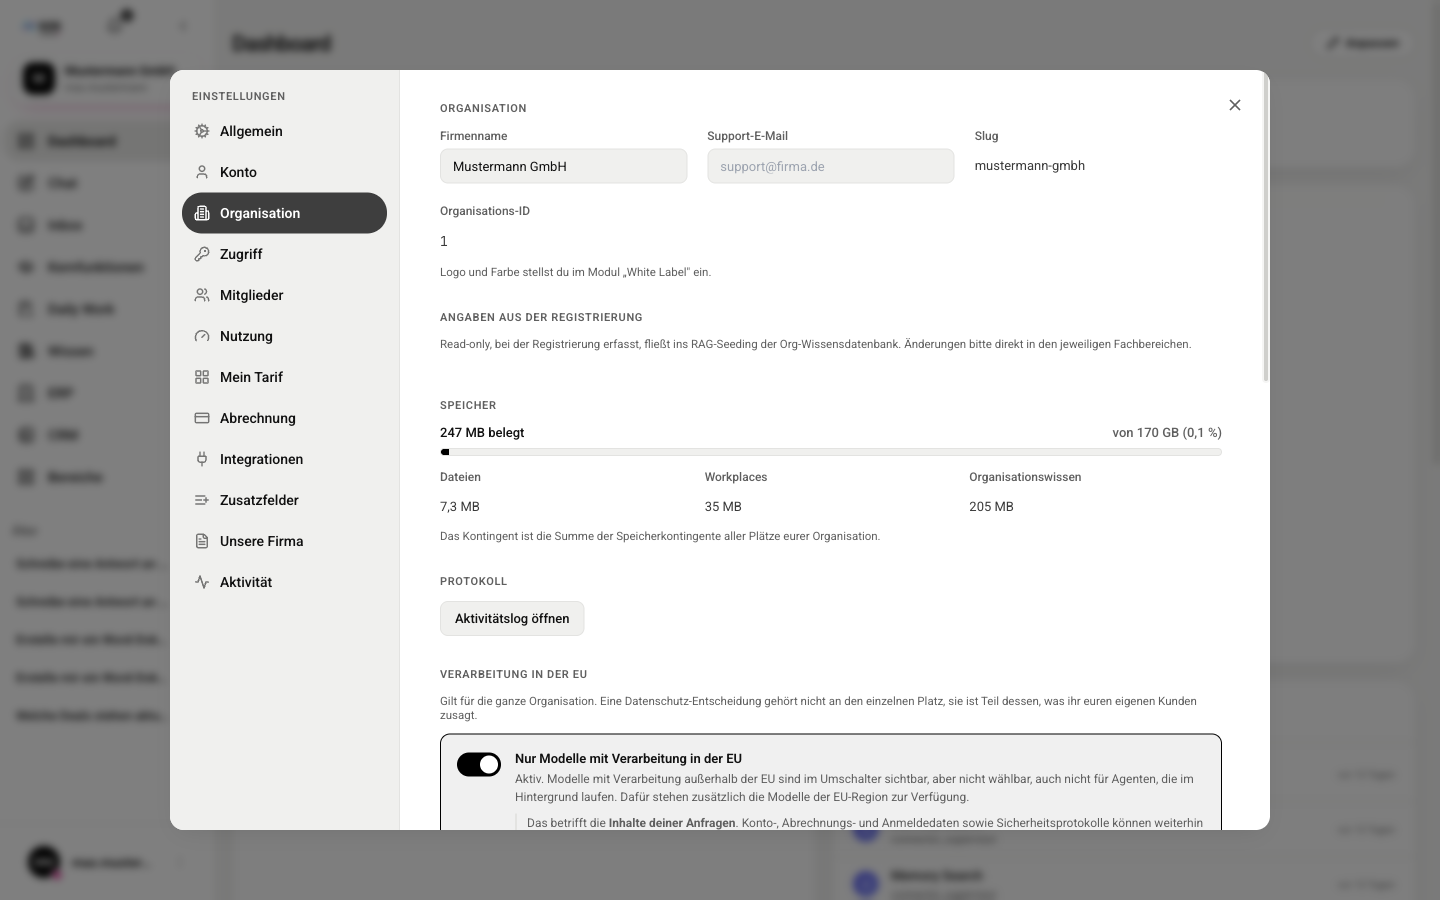
- Open Settings (Einstellungen) and choose Organization (Organisation).
- Change the company name (Firmenname) and the support email (Support-E-Mail). The slug (Slug) and the organization ID (Organisations-ID) are fixed.
- Click Save (Speichern) at the bottom right.
How do I manage members?
The Members (Mitglieder) section shows each person's username, email, plan and usage for the month. Roles, limits and invitations are covered in the article “Invite & Manage Your Team”.
- Open Settings (Einstellungen) and choose Members (Mitglieder).
- Change the role in the dropdown in that row.
- Change the plan with the plan icon (credit card). Only an admin can do this.
- Remove a person with the trash icon and confirm the prompt.
How do I switch between organizations?
If you belong to several organizations, there is a switcher with the name of the current organization above your name in the sidebar. If you only have one organization, it is not shown.
- Click the organization name at the bottom left.
- Choose the organization you want from the list. The active one is highlighted.
- XOS reloads you into the selected organization and opens the home page.
How do I customize the branding?
You manage the logo, colors and login page texts in the Branding tab of the User Management page. Only admins see it, and branding is part of the Max plan.
- Open User Management and switch to the Branding tab.
- Enter the company name (Firmenname), Logo URL and Favicon URL, and choose the colors primary color (Primärfarbe), secondary color (Sekundärfarbe), background (Hintergrund), surface (Oberfläche) and text color (Textfarbe).
- If needed, add the footer text (Footer-Text), support email (Support-Email), login title (Login Titel) and login subtitle (Login Untertitel).
- Check the result in the preview (Vorschau) and click Save (Speichern). Reset (Zurücksetzen) restores the default values.
Privacy settings for admins
As an admin, under Settings, Organization tab (Einstellungen, Reiter Organisation) you find the Processing in the EU (Verarbeitung in der EU) section with the Only models with processing in the EU (Nur Modelle mit Verarbeitung in der EU) switch. It applies to the whole organization.
- When it is on (aktiv), models with processing outside the EU are visible in the model switcher but cannot be selected, not even for agents in the background.
- When it is off (aus), all models can be selected.